
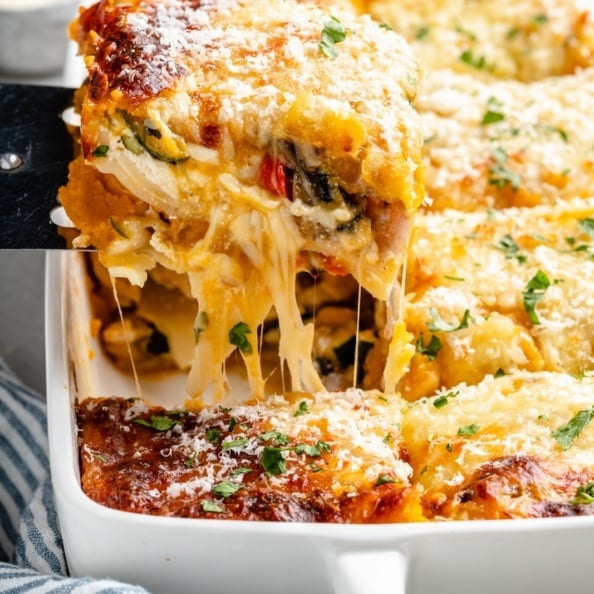
Serious question: is there anything better than layers of roasted veggies, noodles and cheese piled high and bubbling hot? Didn’t think so. Ever since I made my famous turkey lasagna years ago I’ve been in LOVE with creating deliciously savory, cozy lasagna recipes that warm you up from the inside out.
To celebrate fall and all things comfort food, I had to reshare this incredible roasted vegetable butternut squash lasagna filled with everything you could want in a comforting dinner. There are 5 different types of veggies roasted to perfection and snuggled between layers of noodles, cheese, and two types of sauce. Instead of red sauce, we’re making a sweet & savory spiced butternut squash sauce, plus a traditional ricotta layer. All I can say is HOT DAMN this might just be your new fav lasagna recipe that just so happens to be vegetarian.
I included plenty of ways to prep it ahead of time and even freeze it before or after baking so that you can have a wonderful dinner in no time at all. Happy cooking!

What you’ll need to make this butternut squash lasagna
This delicious roasted vegetable lasagna is layered up with beautiful roasted veggies, a classic ricotta mixture, sweet & savory butternut squash, and of course, plenty of melted cheese. It’s truly the perfect vegetarian comfort food! Here’s everything you’ll need to make it:
- For the roasted veggies: we’re using red bell pepper, yellow pepper, red onion, baby bella mushrooms and zucchini. A true rainbow of veggies in this lasagna! You’ll roast them up with olive oil, garlic powder, salt & pepper.
- For the butternut squash: the squash will create a creamy, flavorful sauce layer instead of using traditional tomato sauce in the lasagna. You’ll start by roasting a large butternut squash (get all of our tips & tricks for prepping your squash here!) then blending the flesh with milk, cinnamon, nutmeg, ginger, allspice, salt and pepper.
- For the noodles: you’ll of course need some lasagna noodles to layer it all up!
- For the ricotta mixture: we’re alternating the veggies and butternut squash sauce with a savory ricotta layer made from ricotta, an egg, salt and pepper. Easy.
- For the layers: what’s lasagna without melty cheese? I like to use shredded mozzarella and grated parmesan.
- To garnish: add a sprinkle of fresh chopped parsley for a beautiful garnish.

Easy ways to customize
Out of a few ingredients? Here’s what I can recommend substituting and customizing in this roasted vegetable lasagna recipe:
- Choose your veggies. Feel free to mix and match the roasted veggies with any you have on hand, or use more of one veggie than another! You really can’t go wrong.
- Go gluten free. You can also make this recipe gluten free by using gluten free lasagna noodles.
- Simplify the spices. Out of any of the warming spices? Feel free to use a teaspoon of pumpkin pie spice instead!
- Swap the squash. I love the flavor that butternut squash adds to the cozy sauce, but roasted sweet potato should work well or you can try my pumpkin lasagna.

Can I use no-cook lasagna noodles?
I don’t love using no-cook noodles because they tend to have a different texture, but if you’re in a pinch (or only have no-cook on hand) feel free to use them!

Our best lasagna-making tips
Homemade lasagna may look a bit intimidating because of all of the different components, but with these tips & tricks you’ll be making the BEST roasted veggie butternut squash lasagna like a pro:
- Don’t overcook the noodles. Make sure to boil the noodles just until al dente, not fully cooked because they’ll cook more when you bake the entire lasagna. No one likes mushy noodles!
- Use room temperature ricotta. The ricotta mixture is easiest to mix with room temp ingredients, so I suggest letting the container of ricotta and the egg sit out a bit to come to room temp.
- Pre-cook layers to save time. This butternut squash lasagna is easy to make but it is a bit time-intensive, so feel free to cut down on the prep and cooking by r0asting the veggies and butternut squash up to 3 days ahead of time! Get all of our tips for roasting butternut squash here!

Prep this lasagna ahead of time
This roasted vegetable butternut squash lasagna is the perfect make-ahead meal to serve a vegetarian crowd (and makes amazing leftovers!) To make it ahead of time simply assemble the lasagna completely as directed, cover and place it in the refrigerator one day before serving. It’s the perfect way to save time if you’re making this for Thanksgiving. When you’re ready to serve, bake it up as directed and enjoy!

Two ways to freeze butternut squash lasagna
This easy roasted vegetable lasagna recipe makes the best freezer-friendly meal! Here are two great ways to freeze it:
- Bake first, then freeze. You can either bake it first, then cool to room temperature, slice into servings, place in freezer safe containers and then freeze. Or you can bake it, bring it to room temp, and then freeze the entire pan. Just make sure you double wrap it so the lasagna does not dry out. This is assuming you are freezing the entire pan. Once ready to reheat, thaw it out. Then bake, covered at 350 degrees F for 30-45 minutes or until heated through.
- Freeze before baking: To freeze before baking, simply assemble the lasagna as written in the instructions, then double wrap with plastic wrap and foil and freeze for up to 3 months. Once ready to bake, thaw out then bake according to instructions.

More cozy dinner recipes you’ll love
- Blow Ya Mind Cheddar Broccoli Chicken Pot Pie
- Brown Butter, Ricotta & Butternut Squash Baked Bucatini
- One Pot Butternut Squash Yellow Curry
- One Pot Cheesy Mushroom Spinach Beef Pasta
- Butternut Squash and Black Bean Enchilada Skillet
Get more delicious comfort foods here!
I hope you love this cozy roasted vegetable butternut squash lasagna! If you make it be sure to leave a comment and a rating so I know how you liked it. Enjoy, xo!

Ambitious Kitchen
Cookbook
125 Ridiculously Good For You, Sometimes Indulgent, and Absolutely Never Boring Recipes for Every Meal of the Day
Cozy Roasted Vegetable Butternut Squash Lasagna

Ingredients
- For the roasted veggies:
- 1 red bell pepper, julienned or cut into chunks
- 1 yellow or orange bell pepper, julienned or cut into chunks
- 1 red onion, thinly sliced
- 8 ounces baby bella mushrooms, sliced
- 2 medium zucchini, sliced and quartered
- ½ teaspoon garlic powder
- Freshly ground salt and pepper
- 2 tablespoons olive oil
- For the butternut squash layer:
- 1 large butternut squash (at least 3 pounds)
- ⅔ cup milk (I like unsweetened almond milk, but any milk will work)
- 1 tablespoon brown sugar or coconut sugar (or pure maple syrup)
- ¼ teaspoon cinnamon
- ¼ teaspoon nutmeg
- ¼ teaspoon ginger
- ¼ teaspoon allspice
- ½ teaspoon salt
- Freshly ground black pepper
- For the noodles:
- 10 lasagna noodles
- For the ricotta mixture:
- 1 (15 ounce) container ricotta
- 1 egg
- ½ teaspoon salt
- Freshly ground black pepper
- For the layers:
- 3 cups shredded mozzarella cheese, divided (approximately 12 ounces)
- 1/2 cup grated parmesan cheese, divided
- To garnish:
- Fresh chopped parsley
Instructions
- Preheat the oven to 400 degrees F.
- Add all of the veggies for roasting to a large baking sheet lined with parchment paper. Drizzle with 2 tablespoons of olive oil and sprinkle with garlic powder, salt and pepper. Use your hands to toss the veggies together then spread them out in an even layer. Set aside while you prep your butternut squash.
- Use a sharp knife to cut off both ends of a butternut squash, you’ll cut about ¼-½ inch off each end. Next cut the butternut squash in half vertically. Place the butternut squash upright or vertically on a wooden cutting board that’s very secured to your counter. We don’t want the cutting board or squash to wobble as you cut it. Use your knife to cut the butternut squash vertically down the middle. Use a spoon to scoop out the seeds of the cut butternut squash. Place the butternut squash halves flesh side down on a separate medium baking sheet lined with parchment paper.
- Place both veggies and squash in the oven on two different racks. Roast the veggies for 30 minutes or until they are slightly golden then remove to cool down. The butternut squash will take slightly longer; about 1 hour total or until the squash is very fork tender. Set aside to cool for a little bit before scooping out the flesh. Keep heat in the oven.
- Make the butternut squash sauce: transfer the flesh of the butternut squash to a high powered blender or bowl of a food processor. Add in milk, brown or coconut sugar, cinnamon, nutmeg, ginger, allspice and salt and pepper. Blend until smooth and set aside.
- Do this step while the veggies and squash roast: Bring a large pot of water to a boil. Cook the lasagna noodles for 5-6 minutes, then drain. Immediately lay the noodles flat on an oiled baking sheet or cutting board so you can easily assemble the lasagna when ready. Another option is to soak the lasagna noodles in very warm (hot) water for 20-30 minutes if you do not want to boil them. (Note: you can also use no-cook lasagna noodles, but they aren't my favorite!)
- In the small bowl, add the ricotta, egg, salt and pepper. Mix until well combined. Set aside.
- To assemble the lasagna, spread 3/4 cup of butternut squash mixture over the bottom of a 9x13 inch baking dish. Place 5 of the cooked lasagna noodles on top, laying 4 vertically and 1 horizontally. Spread half of the ricotta cheese mixture on top of the noodles, followed by half of the roasted veggies, then top with ¾ cup shredded mozzarella. Next, add 1 heaping cup of the butternut squash mixture on top of the mozzarella and then sprinkle with 1/4 cup of parmesan cheese.
- Repeat layers once more: adding remaining noodles (4 vertically & 1 horizontally), the rest of the ricotta cheese mixture, remaining roasted veggies, ¾ cup shredded mozzarella, then top with any remaining butternut squash sauce and 1/4 cup parmesan cheese. Finally, top with remaining 1 ½ cups shredded mozzarella cheese.
- Cover with foil and bake for 25 minutes. Remove foil and bake another 15-20 minutes until cheese starts to brown just a bit. Garnish with extra parmesan and either chopped basil or parsley. Cool for 15-20 minutes before cutting and serving. Serves 12.
Recipe Notes
Nutrition
Recipe by: Monique Volz // Ambitious Kitchen | Photography by: Eat Love Eats
This post was originally published on November 2nd, 2021, republished on November 13th, 2022, and republished on December 5th, 2023.


130 comments
I would LOVE to make this, however, my husband is keto… do you recommend doing zucchini noodles or something else?
Thanks!
Possibly, though I haven’t tried it with this recipe! I do have a zucchini lasagna that works really well, though 🙂
Have you tried using eggplant or zucchini as lasagna noodles?
Not in this recipe, but I have a zucchini lasagna recipe that you might like! 🙂
Making this tomorrow, did prep work today, roasting veggies ahead of assembly
Hope it turned out amazing! 🙂
About how many cups of pureed squash does it make? I buy butternut squash already pureed this time of year (or use frozen chunks that I steam and then puree).
Do you think ground chicken would work in this?
I think so, yes!
I made this tonight and it is AMAZING! I see fennel, red onion and baby Bella mushrooms for the roasted vegetables (I skipped the garlic powder) and they are perfect with the warm spices and butternut squash. I will be making this again for sure! I’m thinking spinach would be a good addition as well. This recipe is a keeper.
*used fennel, red onions and mushrooms, that is! (My typo was bugging me!). Seriously, if you like roasted fennel try it in this recipe. It’s delicious!
Delish!!
Woohooo! I’m so happy you loved it. Appreciate the review!
So delicious! Hearty and satisfying. I added some seasoned ground chicken to up the protein.
So glad you loved it, Kaitlyn! Bet it was amazing with the ground chicken 🙂
Absolutely delicious!!! I did add some thyme, oregano, and parsley to the sauce, as well as lean ground turkey for some additional protein, Already looking forward to making this again!
The best cozy and nutritious dinner! My toddler loved it, too. I can also vouch that this is a great use for that partial can of pumpkin you might have sitting around in the fridge – I had about a half can and just mixed it in with the butternut squash!
If I wanted to add a little bit of ground beef, would I add it cooked or raw?
Hi, Houda! I’d recommend cooking it before to develop some flavor and ensure that it’s fully cooked 🙂
Really lovely lasagne. Takes a bit of time as the recipe advises but I will definitely make this again. 😋
Another fabulous cozy healthy, but indulgent recipe! When i fist read over the ingrediencies i was super concerned about cutting this butternut squash. The squash also requires a lot of time to cook. While I was browsing the store for this squash, I found non-frozen butternut squash cubes in a bag! Hello time saver!
If you are looking to save time, or are worried about cutting your hand off cutting into a large squash, I highly recommend the cubed butternut squash in the produce section. It comes in a microwave safe bag (but can also be opened and cooked on the stovetop) that takes six minutes, I threw that in the food processer with the milk and spices and it worked just fine. I found the bag of cube squash at Walmart.
Will be cooking again all winter!
Great idea to use pre-cut squash! And so happy to hear you loved it, Katie. Thanks for the review!
This was absolutely delicious! My husband is the son of a butcher and to him, a meal is not a meal without meat! He loved this! Definitely in the rotation!
I put the whole butternut squash in my slow cooker until it was fork tender, instead of getting the chainsaw out to cut it in half! Worked beautifully!
Thank you for this recipe!
So glad that this one satisfied his appetite and that you guys enjoyed it–thanks for the review! ❤️
This was sooo delish!! The butternut squash sauce was 🤩. I added a top layer of noodles under the sauce and cheese since I had more cooked than I needed. This serves 8 people IMHO. It’s so good you gotta have a big helping!! Thanks for the great recipe!!
YAY! I’m so glad you loved it, Shannon!
I love that this is so full of vegetables and so full of flavor!
Yay! Thanks so much for leaving a review, Nicole 🙂
Oh goodness…this is soooo DELICIOUS!!! I added some purple cabbage I needed to use up to the roasted veggies. The pop of colors is so fun in this recipe. Definitely bookmarked for a staple in our household. Thank you!!
Made this for dinner last night and it was delicious! My 10 month old loved it! I prepared it the day before and only had spaghetti noodles on hand so I just layered everything and let it sit. The noodles softened up perfectly and came out just right after baking! Thanks for the recipe!!
I’m so glad you and your little one loved it! Thanks, Courtney!
I’m not a big fan of butternut squash. It was too heavy on the squash and that overwhelmed most of the taste. The vegetables came through but not as much as I would of liked. I measured out the butternut squash and it was exact. If I made again I would go with a smaller squash and make it with sausage. All in all, it is a good recipe and the vegetable combination was amazingly tasty.
Thanks so much for the feedback! Good to know about the strong squash flavor 🙂
If you are not a fan of the squash then why did you make it and then complain about too heavy on the squash and complain about the recipe…good grief.
So yummy!! Such a colorful mix of veggies and such a great dish! I wish I made into two smaller dishes and froze one before baking. But overall amazing and will make again!
I LOVED THIS RECIPE SO MUCH!! It was very simple and the time spent waiting for the things in the oven was spent cleaning or sitting down. I didnt make any substitutions, but my pan was too small so i only layed four strips of lasgna down and then had two at the end that I just made a small third layer. Cant say enough good things.
Delicious lasagne. Made it three times now and always comes out great. I find it easier to chop the butternut squash into chunks before roasting, and them blend them with the other sauce ingredients but that’s just my personal preference. Would definitely recommend. Thank you 😊.
I’m so thrilled you love this recipe, Charlotte! Thanks so much for taking the time to leave a review 🥰
This was amazing! Takes some time, but mostly hands off cooking time and you described the steps perfectly. I will be making the butternut squash sauce on its own soon because it is soooo good. My kids gobbled this up and my 13 year old asked for leftovers in her school lunch.
This was delicious! Didn’t change a thing and made exactly as instructed. I did buy pre-cubed butternut squash which made roasting a lot quicker and easier.
Phenomenal recipe! A big crowd pleaser, perfect for the fall season and can see this as perfect dish to bring to a Thanksgiving feast. Stuck to the recipe for the most part, but used heavy cream for the milk, went with ~1.5 tbs of maple syrup over the brown sugar, and added some extra cinnamon and nutmeg in place of allspice. Surprisingly paired excellently with some spicy pepper relish I had just whipped up. Highly recommend making this!
I wish that I can eat your food which you cook. They are so delicious!
This was good. Very mild in flavor. There are some things I would do differently for next time tho. Instead of using milk and the spices used here, I would use vegetable broth and butter and a little more salt. Butternut squash has a distinct flavor that goes to a pumpkin pie flavor here. I also added sautéed spinach with garlic and red pepper flakes to the ricotta cheese mixture. That was very good but again needed something there too. Next time I’ll sauté in balsamic vinegar. Give a little bite to the dish. I’ll let you know.😊
Made this the other day. Followed recipe exactly. Delicious! Absolutely delicious! Will make again for sure. Took a loooooong time but worth it!
Yay! SO glad you’re a fan 😊
The oven really fulfills a lot of my ideas.
I absolutely love this oven recipe~
I recommend this for you: https://saucegrandmaster.com/puff-pastry-cream-of-mushroom-soup/
This recipe was delicious! The perfect mix of cozy and comforting with a distinctly fall flavor. My husband even said “I would ask for this for my birthday!”
I did make a few slight changes just based on our needs and what I had on hand: since I’m gluten intolerant, I used almond flour tortillas from Trader Joe’s in place of lasagna noodles and they held up really well. (It was also quicker since we didn’t have to cook the noodles) We also added about 2/3 LB of Italian chicken sausage to the veggie mix. Followed everything else exactly and was so satisfied! Will definitely be making this again soon!
I made this for a fellowship meal at our church and it was a huge hit. Now I’m making it again to take to family over Thanksgiving. I’d love to know if anyone has frozen it, and if they did which method they used, and how it turned out. I’m tempted to freeze it unbaked, and not thaw it, and bake it for a longer period of time covered. Any advice is appreciated.
I am thinking of making this for Christmas but my sisters cannot have anything with nutmeg. If I leave it out will that be detrimental to the recipe? Any suggested substitution? Thanks much!
Hi Mary! I just made this recipe today without nutmeg or allspice & it came out great! I used cloves instead.
I made this yesterday and it is INCREDIBLE. It’s worth the time to make. Thank you so much 🙂
Ah so happy to hear that. Glad you loved this recipe ❤️🙂
Absolutely delicious! Entire family raved, even the meat eaters. My husband is vegetarian and he requested I put it in regular rotation. The flavors were just perfect- only different thing I added was some dried sage in with the ricotta. When roasting the veggies, I put the squash on the bottom rack and it was actually done the same time as the rest of the veg. Beautiful and easy, very yummy lasagna- thank you!
Ahh this is amazing!! So glad you are a fan of this recipe and it is a hit for the whole family!
Love this recipe! We don’t love those spices in dinner type recipes so I used an italian seasoning blend, some red pepper flake and garlic powder in the squash purée. Also, no need to precook the noodles. I just place them In there raw and make sure there’s enough purée and ricotta liquid to cook the pasta. So so good. We topped it with a little pesto and some maldon salt. Yum! Thank you Monique.
So glad you enjoyed this recipe ❤️🙂
I made this recipe today for my whole family who were coming for lunch. It has been a total success. The perfectly balanced flavors. The sweetness of the pumpkin with the spices, the ricotta, the baked vegetables, a wonder for all the senses. It remains with us as a favorite recipe and we will repeat it for sure. Original, special and very comforting. Many thanks from Barcelona, Spain. A hug and Merry Christmas from a follower of your very good work!
I’m so glad this was a hit with the whole family! Thanks so much for your note – merry Christmas!
I couldn’t rate the stars in the other comment
I found that prep time was more like 2 hours rather than 30 mins!
In my opinion butternut squash has a natural sweetness that doesnt need any added sugar.
I made it without sugar and spices and found it to be absolutely delicious.
I’ll definitely make this again.
Thankyou
Would it be possible to make this with canned squash? If so, how much? Thank you!
You need at least 3 lbs.
This was certainly a task, but well worth it! I didn’t have 3 pounds of squash so I used a pumpkin and squash blend…will be on my rotation!
Made it exactly as written. Everyone loved it. I prepared everything 3 hours ahead of time and popped it in the oven hour before guests were to arrive
Excellent! I am so glad you are loving this recipe 🙂
This came on my FB feed today so I made it for dinner and it was absolutely amazing!!!
I made a tofu ricotta instead of store bought and only had no-cook lasagne noodles but it still turned out perfect.
Even though it took time to prepare, it was totally worth it
Loved the butternut squash sauce along with the cheesy topping 10/10
So anxious to try this – yet still needing to know the frozen-squash-purée equivalent to use. I roasted, puréed, and froze several 2-cup pkgs and will use it, but a 3-lb squash minus the rind would be…?? This higher-level math just slays me…🤭
Hi Terry – I would suggest anywhere from 2-3 cups of pureed squash should be equivalent to a 3 lb squash.
This dish was a hit with a bunch of friends that I had over for dinner. It does take a bit of time so I prepped the recipe the night before & baked shortly before serving. None of the steps were difficult and the steps were written out very clearly. I used Kite Hill brand vegan ricotta because I’m somewhat sensitive to dairy but otherwise followed the directions exactly and love this lasagna! Thanks Monique for all of your recipes. Your website is always the first place I check when I need some inspiration.
Aw this means so much to me! Thank you, glad you are loving my recipes! ❤️🙂
Question….can I make this lasagna without any mozzarella and Parmesan cheese? Would replacing it with nutritional yeast work? If so, how much would I add? Thank you!
Sounds delicious. How many cups of sauce does the butternut squash make? Thank you.
I haven’t measured it but I would say about 2-3 cups
This was so delicious!
I made a vegan/gf version of this today & it was an absolute hit! A very discerning 2 year old literally gave it the chefs kiss, & her dad said it was the BEST lasagna he has ever had – vegan or not. For the cheeses I used Kite Hill ricotta, Violife shredded mozzarella, & Follow Your Heart Parmesan. For the egg I used ground flaxseed + water. The gluten free lasagna noodles were from an Italian brand called Bi Alimenta. For the butternut squash sauce I used up things I already had, so soy milk instead of almond milk, half maple syrup half agave, one butternut squash & one can of pumpkin puree. I didn’t have any allspice or nutmeg so I used cloves. I baked it about 10 mins longer than the instructions then broiled it for about 3-5 mins to get the vegan mozzarella to brown up on top. I would definitely make this again & my friends will be hoping for it! Thanks Monique!
Of course! So glad this recipe is a hit ❤️
My husband and I had this for dinner this past week and it was so tasty! The butternut squash blended was 10/10! I love knowing I am getting all the veggies in! My husband specifically liked it because there were no tomatoes for a lasagna dish… little change up ( he’s playing around with an acidic ingredients right now). I am looking forward to making this recipe again. 🙂
Excellent! So glad this recipe is a hit and you are both loving it 🙂
I LOVE butternut squash and love this dish! Even with cooking the butternut squash the day before, it was labor-intensive to make but so worth it. Next time I will probably prep the veggies ahead of time as well. I used brown rice lasagna noodles for extra nutrition and you couldn’t tell the difference, they cooked wonderfully.
Yay! I am so glad you are loving this recipe and it turned out great for you ❤️
I decided to grow butternut squash this year and found myself with more than I knew what to do with. So happy to find this recipe! I made it exactly to the recipe with the only exception being I used white sugar instead of brown since that was all I had on hand. It was very good. The butternut sauce is seriously to die for, I’d have been happy eating a whole bowl of it by itself. The lasagna is very ooey gooey good. My only critique is that it needed something acidic added to it to balance the flavors. The addition of diced tomatos or cooking the veggies in red wine or lemon juice would have really taken this a higher level of yum.
Ah I am so glad you found this recipe, Leigh Ann! Thanks so much for your feedback but I am happy to hear this recipe is a hit!
My daughter and I just made this exactly per the recipe and it is fantastic. We roasted the veggies and squash last night and the rest today. When I first smelled it cooking from upstairs I thought of spice cake. This recipe is very appropriate for fall coming. Will definitely make again. She spotted the recipe on Instagram.
YUM! I am so glad you found this recipe and it turned out great for you, Jane ❤️
This looks lovely. My question is: Is it sweet? When looking at the ingredients it seems like it will be sweet. Also can I cut the recipe in half? I will probably only be making it for myself since my
husband does not like squash of any kind. Thank you.
Hi Renee – It is the most perfect blend of sweet and savory. I think it’ll be challenging to cut this recipe in half, but you can make it and freeze what you don’t eat for a later time. Hope you enjoy!
This is delicious! Perfect for autumn.
I did find it took me longer than the two and half hours allotted. Would you recommend making the butternut squash layer ahead of time, freezing it, and thawing it when ready to assemble?
Hi Casey! Glad you enjoyed this recipe 🙂 What part of the recipe did you feel took you the longest? I haven’t tried freezing it, but I am sure it would last in the fridge for a few days before assembling.
Made this as is, just didn’t use the egg. Used no boil noodles because that’s what I had. This was so good!! Will definitely make again. Thanks for the recipe!
Ah yay! I am so happy you are loving this recipe and it turned out great for you!
please add sodium content to Nutrition list i am tring to also eat heart healthy
thank you
I’m not much of a cook and live by myself, so spending a lot of time on meals is not usually my thing. BUT boy oh boy was this worth it. again – not much of a cook and I tend to work slower than most, so took me ~4 hours start to finish 😅 1hr to prep veggies and toss into the oven, 1 hour of roasting (prepped the ricotta and sauce ingredients during this time), 1.25 hrs cooling + making the sauce and layering (honestly have no idea why this took so long – I think I was just feeling like remy from ratatouille layering everything & took my time lol), and then another 50 minutes baking (25 mins initially, then 25 minutes w/o foil – was aiming for a broiled look without actually broiling since I was using glass). so I’d rec starting early in the day or making the lasagna the day before and baking the next, as many others have said. someone else commented this, but seconding roasting the veggies with some wine – would definitely elevate it w some acidity – but it is soooo delicious as is !! I used no-boil noodles and dipped them into the juice leftover from the roasted veggies just to make sure they weren’t too dry (don’t know if this did much tbh, but call it an extra measure). the squash I used yielded about 36oz of sauce, which was great because my lasagna was extra saucy (oh and this sauce btw … just wow). I can’t wait to break this out closer to thanksgiving (: this definitely lives up to its name: insanely cozy meal – feels like a hug eating this 🥰 thank you for sharing this recipe monique !!
Aww thank you so much for giving this a try and I am so glad it turned out great for you!
SO AMAZING! I have yet to try a recipe of yours I don’t like but this is something special. There is a LOT of prep work and I added shredded chicken and also wilted spinach to the ricotta but it is SO WORTH IT! Even my husband who by now is rolling his eyes every time I say dinner is “fall-inspired” loved it! Thank you for sharing!
Hi Chelsea – this makes me so happy to hear. I am glad you gave this recipe a try and are loving it – this is such a fall inspired dish and one of my faves.
Made the squash veggie lasagna! Was absolutely delicious and a huge family hit! I made it both gf and diary free. My favorite gf pasta is Rummo and Green Valley Lactoses Free has a great line of lactose free cheese that is REAL CHEESE! They don’t have a ricotta in their product line, so just used their cottage cheese and added 1 more egg. Thanks Monique!
I real all the comments but did not see the answer to my question so here goes. I am going to make it especially after reading all the positive comments and helpful hints. Your directions & pictures are going to be so helpful. However, I am afraid to cut a butternut squash so if I buy the cubed squash that comes in a pkg from Trader Joes or the market, how many cups would I need? Thank you
I decided to buy a butternut squash & cut it myself. It was very easy to peel and cut up. It also was on sale so a little under $3 (16 oz of cut-up butternut squash at Sprouts was $3.98). So it is a savings. I am looking forward to making it today!!
I would say about 4 cups of cubed butternut squash!
This is the third recipe I have tried from ambitious kitchen. The first two were amazing so I figured I would give this one a try also. This was awful. It tasted like pumpkin pie married veggie lasagna. Gag worthy. Lasagna should never taste like this. I will leave a review in the amazing Turkey Chili (best ever) and the Ginger Healing Chicken Soup (savory, different and delicious) but I would not recommend this.
Hi Kathleen – Thanks for your feedback, everyone has different preferences and this one, while a hit for most, sounds not to be up your alley. No problem, many people actually love the fall flavors of this lasagna!
To be honest, I wasn’t really sure about this. Kind of person that likes to keep my things status quo. HOWEVER….. this was absolutely delicious…. so good. 😋
Ahh this is so amazing, Jennifer! Glad you gave this recipe a try and it turned out great for you
This recipe is going to be a new staple in our home. I wouldn’t change one thing!
So happy to hear that! Love this for a cozy winter dinner.
What would be the approximate quantity of butternut squash after roasting? Would frozen squash be an acceptable substitute?
You can definitely use frozen squash! I would suggest thawing at least 3 pounds of squash, then roast it as direction. You’ll then want to blend the squash cubes so that you get a puree.
Such an AMAZING COMFORTING WINTER DINNER!!!! I love the subtle pumpkin spices in with all the cheesy goodness and plenty of veggies! To save time I used some homemade pumpkin puree I already had made instead of roasting a squash and I sauted the veggies in the cast iron skillet to make those faster. Cottage cheese works great in this too! Added whole wheat lasagna noodles for extra nutrition! Thanks for the yummy recipe!!!!
Great idea for swapping in pumpkin puree! One of our fav winter dinners, too 🙂
This recipe is *chefs kiss*. Seriously the best veggie lasagna I’ve ever had. It turned out with so much flavour. I added some truffle oil on the top and very much recommend trying that!
So glad you loved it! Truffle oil sounds AMAZING.
I made this a few weeks ago and I’m still drooling over it. It was so deliciously comforting. I didn’t have enough butternut squash, I only had about 1 1/2 lbs, but I did have a kabocha squash, so I used that one as a supplement for the 3 lbs, and it turned out amazing. I keep telling everyone I made the best lasagna ever, and this is it! It’s like Thanksgiving and warm fuzzy feelings in one bite.
Great idea to add some kabocha squash! Perfect comfort meal 🙂
Absolutely amazing. I didn’t taste the veggies or sauce while cooking, and had a creeping feeling it would be too sweet from the squash or “healthy-tasting.” NOPE! 🙂
It is phenomenal and I have to make it again. I added chopped spinach to the ricotta mix, added a layer of spinach, and omitted the sugar altogether. It could use even more veggies next time. An absolute fall delight, and wonderful spin on the classic lasagna.
This one’s great for customizing! So glad you loved it!
Very saucy and mild flavor. I’d opt for half the squash puree and twice the veggies. I love cinnamon, but maybe not in my lasagna.
Sorry to hear this wasn’t a hit! Always feel free to bump up the salt to bring out the extra flavors. The cinnamon is meant to give this lasagna a lovely, fall-inspired flavor, but you can leave it out if you’d like.
This recipe is a labor of love but so incredibly worth it! We used chopped/roasted broccoli in place of zucchini since my store was out, but I think any roasted veggies would be perfect in this. We used our last butternut squash from the garden and the sauce was cozy, silky and perfect. We also assembled it all the night before and it baked up perfectly!
This one’s great for adding any veggies you like! Such a fun cozy dinner 🙂
Time consuming to make but so good and so worth it. My calorie calculator did list it at double the amount of calories (and then some) as listed in the recipe so if someone is strictly monitoring that could be a problem.
So glad you enjoyed! Hmmm did you compute the nutrition facts based on 12 servings? Just double-checked and what’s written is accurate!
Everything looks delicious can’t wait to try these
You asked to boil the lasagne noodle but they stick together and I couldn’t separate them, will they not cook through in th oven anyway? Why bother?
Hi! Be sure to separate the noodles as soon as they’re done boiling and laying them on a flat surface where they don’t touch. There are “no boil” lasagna noodles that will cook in the oven, but regular lasagna noodles (which I prefer) must be boiled beforehand.
This is one of the most amazing lasagna’s I have ever made! Thank you for the recipe 🙂
I’m so glad!!
I did not read the ingredients before cooking but it has garlic, cinnamon, ginger, allspice, and nutmeg and in my opinion garlic is not a good mix with the others It also has no tomato sauce. It was a very involved recipe but my boyfriend and I were disappointed when we ate it. I guess tomato sauce just seems like a given as an ingredient in lasagna. The roasted vegetables were a good idea but I won’t be making this again. I’d replace the squash with marinara.
Fantastic! A new favorite! We add 1lb of spicy sausage to the veggies.
I would say prep and assembly takes 1-1.5 hours not 30 minutes. 😅 We’ve cooked this recipe twice and it’s taken is much longer both times.
So glad you enjoyed! I include any cooking steps (roasting the veggies, etc.) as cook time (rather than prep time) so that might be why! Is the whole thing taking about 2 hours and 15 minutes? I’ve adjusted and added another 15 minutes to prep as well 🙂
Can you use frozen butternut squash ?